Projects · 11 min read
The Weekend Workbench: Sturdy, Flat, and Built From 2x4s
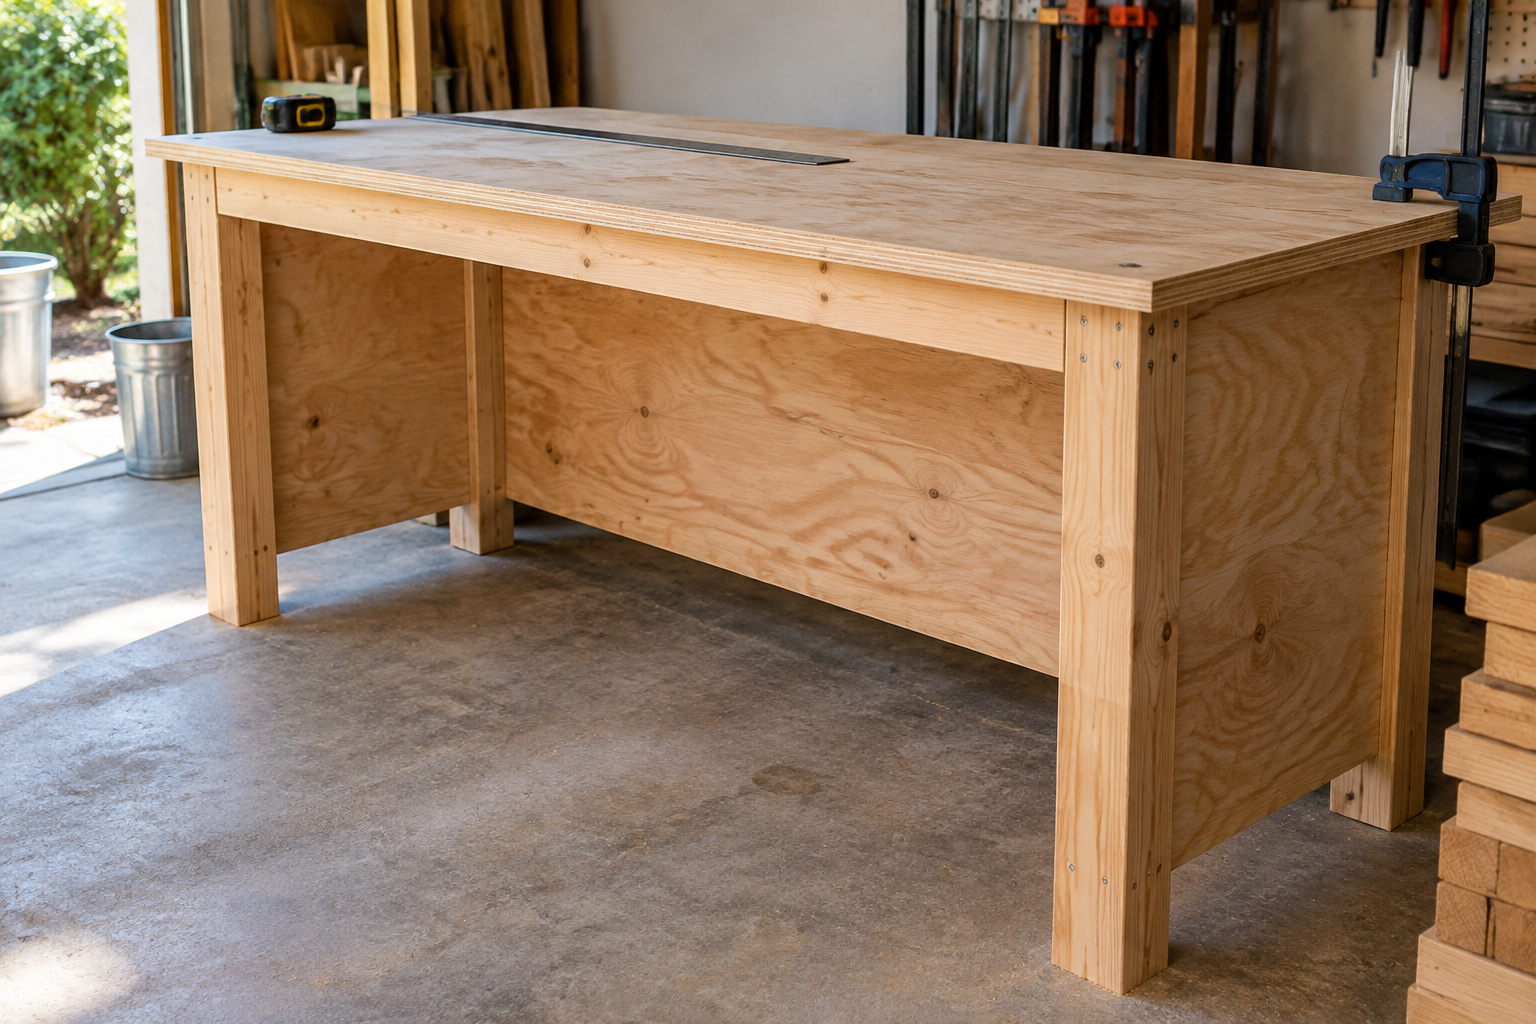
A sturdy 2x4 workbench needs three things: a top supported by a straight frame, legs that carry the load directly, and bracing that prevents sideways movement. This weekend build combines a doubled plywood top with a 2x4 base and plywood bracing—no planer, complicated joints, or expensive hardware required.
2x4 workbench dimensions and estimated cost
The finished bench measures 60 inches long × 23-3/4 inches deep × 35-1/2 inches high (1,524 × 603 × 902 mm). That is enough space for small furniture assemblies and benchtop tools without swallowing a one-car garage.
The top is plywood rather than laminated construction lumber. That is intentional: it avoids the drying, jointing, and flattening work that can turn a weekend project into a month-long detour.
| Component | Specification | Why it matters |
|---|---|---|
| Top | Two nominal 3/4-inch (19 mm) plywood layers | Adds stiffness and gives you a substantial working surface |
| Upper frame | 54 × 21 inches (1,372 × 533 mm) | Supports the top while leaving useful end overhangs |
| Legs | Doubled 2x4s, 30-1/2 inches (775 mm) long | Frame rests directly on the leg ends |
| Bracing | Nominal 1/2-inch (13 mm) plywood across the back and both ends | Prevents racking without closing the front |
| Finished height | Approximately 35-1/2 inches (902 mm) | A reasonable starting point for mixed shop work |
Allow roughly $120–$225 for materials, excluding tools, a vise, and delivery. These are estimated US retail prices, not quotes; plywood quality and local lumber prices will move the total.
Plan on two shop days, with an overnight glue cure between them. Buy the lumber earlier if possible so it can settle into the shop.
Choose your workbench height before cutting
Mock up the proposed height with a board on sawhorses. Stand naturally, then try sanding, marking, and pushing a hand plane.
A taller bench favors close work; a lower bench makes it easier to put your weight over a plane. For this design:
Leg length = desired height − actual top thickness − 3-1/2 inches (89 mm).
Measure the plywood. Two sheets sold as 3/4 inch may not total a full 1-1/2 inches (38 mm). Add any leveling-foot height to your calculation before cutting legs.
Materials and 2x4 workbench cut list
Buy six straight, kiln-dried 2x4s, each 8 feet long (2,438 mm). Five provide the required parts with careful cutting; the sixth gives you room to reject a knot, split, or twisted section.
You also need:
- One 4 × 8-foot (1,219 × 2,438 mm) sheet of nominal 3/4-inch (19 mm) plywood for the top.
- One same-size sheet of nominal 1/2-inch (13 mm) plywood for the bracing.
- Wood glue.
- Approximately 40 construction screws, 3 inches (76 mm) long, for leg laminations and frame assembly.
- Approximately 70 wood screws, 1-1/2 inches (38 mm) long, for bracing.
- Approximately 30 wood screws, 1-1/4 inches (32 mm) long, for laminating the top.
- Approximately 16 wood screws, 2-1/2 inches (64 mm) long, for attaching the top.
- Hardwood shims, sandpaper, and an optional light finish.
Use construction or wood screws, not brittle drywall screws. Have a drill/driver, countersink bit, saw, clamps, square, tape measure, and a trustworthy straightedge available.
Cut the 2x4 parts
Actual 2x4 dimensions are approximately 1-1/2 × 3-1/2 inches (38 × 89 mm).
| Part | Quantity | Cut length |
|---|---|---|
| Front and rear upper rails | 2 | 54 inches (1,372 mm) |
| Upper end rails | 2 | 18 inches (457 mm) |
| Interior top supports | 2 | 18 inches (457 mm) |
| Leg laminations | 8 | 30-1/2 inches (775 mm) |
Each of two boards supplies one long rail and two short pieces. Three more boards supply the eight leg pieces, cutting three, three, and two respectively.
Account for saw kerf and trim damaged ends before measuring finished parts. The Cut List & Waste Optimizer helps check your layout if you change the bench dimensions.
Cut the plywood parts
| Part | Quantity | Dimensions |
|---|---|---|
| Top layers | 2 | 60 × 23-3/4 inches (1,524 × 603 mm) |
| Rear brace | 1 | 54 × 24 inches (1,372 × 610 mm) |
| End braces | 2 | 21 × 24 inches (533 × 610 mm) |
The top is deliberately narrower than 24 inches (610 mm). You cannot rip two full 24-inch-wide pieces from a true 48-inch-wide sheet while also allowing for the blade kerf.
For the braces, first crosscut the thinner sheet at 54 inches (1,372 mm). Rip the rear brace from that section. The remaining roughly 42 × 48-inch (1,067 × 1,219 mm) section easily supplies both end braces, allowing for kerf.
Use the Plywood Sheet Calculator to estimate sheet quantities for a larger version, then sketch the actual cuts before buying.
Support sheet goods fully on rigid foam or a suitable cutting platform. Set a circular saw blade just below the sheet, keep the cord clear, and wear eye and hearing protection. Use dust extraction and appropriate respiratory protection when cutting or sanding plywood.
Build a base that carries weight without wobbling
1. Select straight rails and laminate the legs
Reserve the straightest boards for the upper rails. A bowed upper frame will pull the top out of flat; screws do not cure crooked lumber.
Glue each pair of leg pieces broad-face to broad-face, making four legs approximately 3 × 3-1/2 inches (76 × 89 mm) in section. Align the ends carefully, clamp, and add four 3-inch (76 mm) screws per leg as assembly aids. Predrill near the ends and stagger the screws.
Let the glue cure according to its label. Then check that all four legs are the same length and their ends are square.
2. Assemble the upper frame
Stand the rails on edge. The 18-inch (457 mm) end rails fit between the two long rails, producing an outside frame size of 54 × 21 inches (1,372 × 533 mm).
Predrill and drive two 3-inch (76 mm) screws through each long rail into each end rail. Install the two interior supports between the long rails, with their centerlines approximately 18 and 36 inches (457 and 914 mm) from one end.
Keep every upper edge flush. Assemble on a verified flat surface, not directly on an uneven driveway.
Measure corner to corner in both directions. Equal diagonals establish squareness; the Diagonal & Squareness Calculator gives you a target measurement. Also check for twist: equal diagonals alone do not prove that all four corners lie in one plane.
3. Stand the frame on the legs
Place each leg directly beneath a corner. Orient its 3-1/2-inch (89 mm) dimension along the bench length and its 3-inch (76 mm) dimension front to back.
Align the outside leg faces with the outside frame faces. Both adjoining rails should bear on the leg end. This matters: downward loads travel through wood resting on wood rather than hanging entirely from screws.
Clamp the assembly securely and use temporary diagonal scraps to hold it square. Do not put weight on this unbraced assembly.
4. Attach the plywood bracing
Position the rear panel against the back of the frame and rear legs. Its upper edge is flush with the frame top. Position the end panels the same way, spanning each end rail and both legs below it.
The rear panel covers the frame width; the end panels cover its depth. Their outside corners need not overlap. Each panel fastens independently to the underlying lumber.
With the standard leg length, the panels stop approximately 10 inches (254 mm) above the floor. That leaves sweeping room while providing deep, effective bracing.
Check that the legs are plumb and the frame remains square. Predrill and fasten the panels with 1-1/2-inch (38 mm) screws approximately every 6 inches (152 mm) wherever plywood crosses a rail or leg. Keep screws about 3/4 inch (19 mm) from plywood edges where practical, and center them over solid wood.
The panels do two jobs: they resist racking and connect the upper frame to the legs. Leave them installed during use. The open front preserves knee room and access underneath.
Make the plywood workbench top flat
5. Laminate the top on the checked frame
Inspect both plywood pieces for bow. Mild curvature may flatten during assembly; badly warped sheets should be exchanged rather than forced into service.
Check the frame with a straightedge lengthwise, across its width, and diagonally. Correct high joints now. Lay release paper over the frame so squeeze-out cannot glue the top to it.
Place the eventual upper layer on the frame with its working face down. Spread an even coat of wood glue over the mating face, then set the second layer on it.
Clamp the perimeter and use straight cauls or distributed weights to maintain contact. Drive 1-1/4-inch (32 mm) screws from this exposed underside on an approximately 10–12-inch (254–305 mm) grid, working outward from the center. Avoid drawing a gap closed so aggressively that you distort the assembly.
Test screw length in matching scraps first. Countersink only enough to seat the heads; an overly deep countersink can let a screw tip break through the working face.
Leave the top undisturbed for the glue’s specified cure time.
6. Attach the top without introducing twist
Turn the cured top over with help. Center it on the frame, leaving 3-inch (76 mm) overhangs at the ends and 1-3/8-inch (35 mm) overhangs front and back, measured from the frame—not the brace panels.
The panels reduce the clear overhang slightly. The ends remain the best locations for ordinary clamp jaws.
Fasten downward into the rails and interior supports with 2-1/2-inch (64 mm) screws. Locate them carefully to avoid the lamination screws. Countersink the heads slightly below the working surface.
Do not glue the top to the base. Removable screws let you repair or replace it later.
Ease the sharp plywood edges with a sanding block. A light finish can make glue cleanup easier, but skip a slick, heavily waxed surface if you expect to hand-plane on this bench.
Check stability before adding a vise
Move the bench to its permanent location. If it rocks, shim the short corner with a broad hardwood shim. Do not shorten a leg until you have ruled out an uneven floor.
Push against the top from the front and both ends. Movement at a joint calls for inspection; movement of the whole bench across the floor calls for better footing, added low ballast, or appropriate anchoring.
This is a general-purpose woodworking bench, not a rated lifting platform. Do not stand on it or assume an unsupported end can carry a heavy machine.
For a vise, follow the manufacturer’s mounting pattern and add solid blocking tied into the frame. Do not rely only on screws driven into the plywood edge.
Common mistakes when building a 2x4 workbench
- Using wet or twisted studs. Drying lumber can move enough to spoil an otherwise careful build. Choose dry stock and give it time in the shop.
- Skipping the back panel. Strong legs do not prevent a rectangular base from racking sideways.
- Checking level instead of flatness. A bench can be flat without being perfectly level. Look for twist and gaps beneath a straightedge.
- Pulling the top onto a crooked frame. Fix the support surface before fastening the top.
- Treating screws as clamps for large gaps. Bring mating parts together first; screws should hold the fit, not manufacture it.
- Adding ordinary swivel casters. They can introduce movement even when locked. Retractable casters that return the legs to the floor are a better fit for planing and chopping.
FAQ
Is a 2x4 workbench strong enough for woodworking?
Yes, for ordinary assembly, sanding, drilling, and moderate hand-tool work when properly built and braced. Strength depends on lumber condition, connections, and load placement; this plan does not establish a certified weight capacity.
Do I need a planer or jointer for this build?
No. Select straight lumber, make square cuts, and keep the frame edges aligned. The plywood top avoids the milling required for a flat, edge-glued 2x4 slab.
Can I make the workbench 72 inches long?
Yes, but revise the frame, bracing, and cutting layout together. Keep interior top supports approximately 18 inches (457 mm) apart or closer, and maintain direct support beneath concentrated loads. The longer rear brace also changes your plywood layout.
Should I glue the top to the base?
No. Glue the two plywood layers together, but screw that assembly to the frame. A replaceable top is valuable on a bench that will collect drill marks, glue spots, and occasional saw cuts.
How flat does a woodworking workbench need to be?
For general assembly, aim for no rocking and no abrupt ridges. A practical shop target is no more than roughly 1/32 inch (0.8 mm) of gap under a reliable 48-inch (1,219 mm) straightedge, checked in several directions. That is a useful build target, not a universal standard; precision fixtures may need a separate reference surface.
What should I read next?
Recommended tools
Digital Angle Gauge
Dial your blade in to 0.1°
View on Amazon →
Laser Tape Measure
Measure long spans solo, fast
View on Amazon →
Titebond III Wood Glue
Waterproof and stronger than the wood
View on Amazon →
As an Amazon Associate we earn from qualifying purchases.
Need ready-to-build plans?
5 complete build plans with cut lists — $14.